Monday, October 29, 2012
Recycling Yarn from Store Bought Sweaters
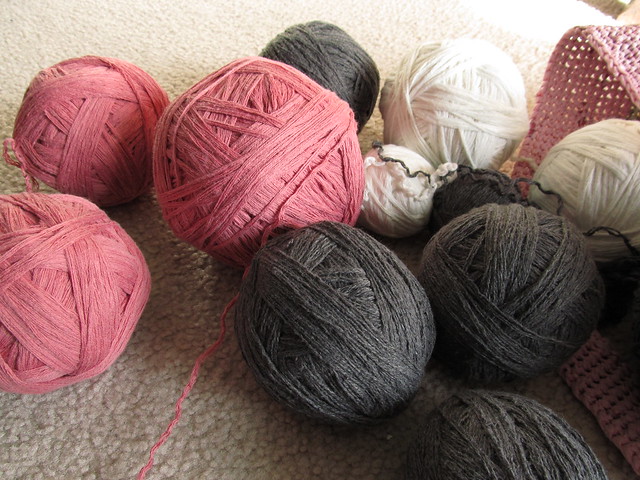
Did you know that you can recycle the yarn from store bought sweaters? It's definitely possible and once you know what you are doing, it is very easy to accomplish. In my experience, yarn that is unravelled from sweaters is much more fun to work with because there is less pressure than buying yarn brand new from the store. Yarn that is recycled is...
1) Less Expensive!
If you buy a sweater from a used clothing store, you can usually find a sweater's worth of yarn for $10 or less
2) Care Instructions
It is common practice for store bought garments to have labels on them that tell you how to wash it. Also, because the clothing in a thrift store is already worn, you can immediately weed out sweaters that are easily felted, hard to care for, pill easily because you get to see what the yarn looks like knit up before you buy it
3) Protects Landfills
Sweaters don't literally protect landfills but if you recycle yarn instead of always buying store bought, you are keeping that sweater out of the garbage heap and you are making something beautiful out of it (remember the 3 R's-Reduce, Reuse and Recycle?). Even though sweaters at thrift stores have the potential of being purchased as is and reused by another customer, it still helps the avid diy enthusiast from burdening the planet.
4) Protects the Ecosystem
Unless you purchase yarn that has a completely see-through policy about their production methods, you could potentially adding to the overuse of pesticides on plant crops such as cotton or bamboo. Reusing yarn decreases the need for yarn production and therefore pesticide use
5) Less Knots
This is just a personal preference, but I find that store bought sweater yarn has fewer knots than conventional yarn. Also, since you are unravelling whole garment pieces instead of using individual skeins, there are less knots necessary for connecting pieces together.
So, now that you are aware of how cool it is to reuse yarn, let's get on our merry way shall we?
So, first thing you're going to need to do is acquire a sweater acceptable to our purposes. Not all sweaters are created equally but I am here to arm you with the knowledge you need to choose the right sweater.
TIP: It is always better to look for sweaters in the biggest sizes possible, including mens sweaters because obviously there is more yarn. You don't need to make sure the sweater fits your body because it is going to be deconstructed later.
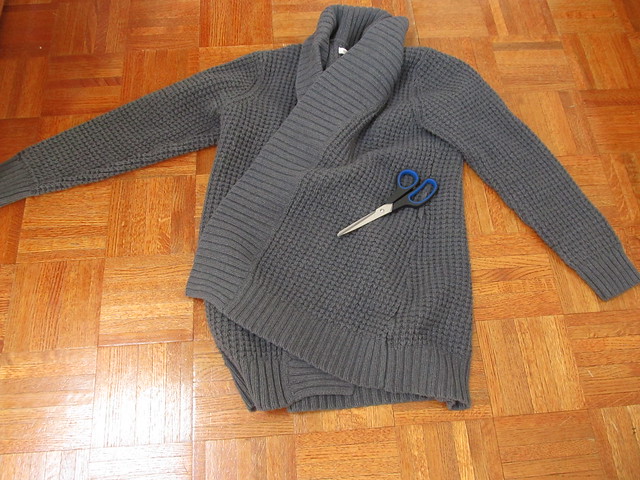
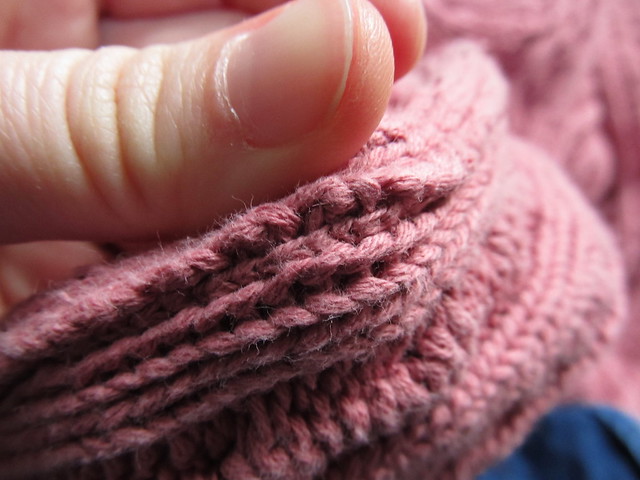
Let's have a look at the inside of the sweater. One of the ways you can tell if a sweater is good for recycling is to check out the seams. If all the seams on your sweater look like this one, which is serged with a serger machine and therefore the pieces of the sweater were cut up and sewn together, then you can put it right back down.
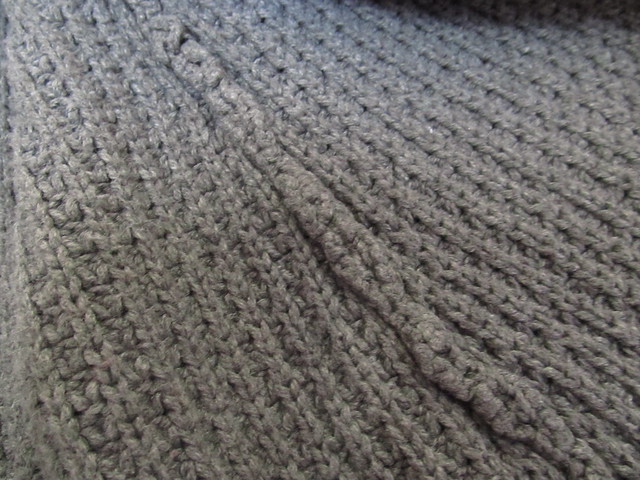
If your sweater seams all look like this, slightly bulky and not sewn together with a sewing machine, then you are one step closer to having a great sweater.
TIP: Make sure you look at the label of the sweater to see what the yarn is made out of and what the care instructions are. Cotton sweaters are pretty easy to unravel, although they might not be super soft when you are finished. Cotton is better for projects that don't need to be against the skin because it is made more durably than other yarns. Also, if the yarn is acceptable next to your skin when it is in thrift store sweater form, it will be acceptable once you unravel it. Be careful of purchasing wool because it will shrink on you if not properly cared for.
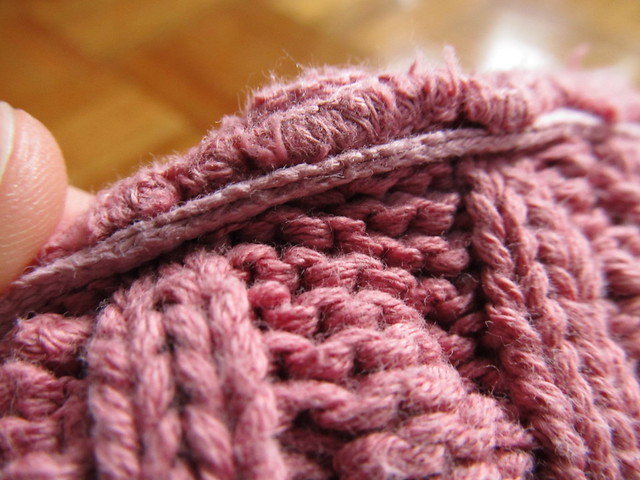
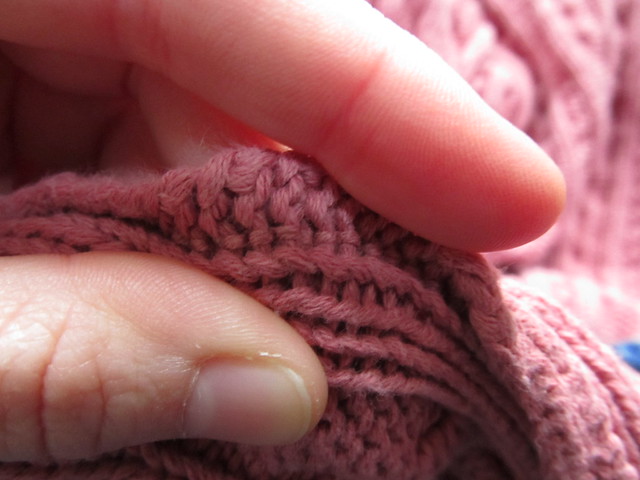
Next, you'll want to figure out what kind of seam you actually have. This sweater, except for the very top of the neck which was serged, has a crochet seam which is very easy to unravel. It is identifiable because it has a row of little v's on one side of the seam and a row of dashes on the other (look at the next picture to see what I'm talking about).
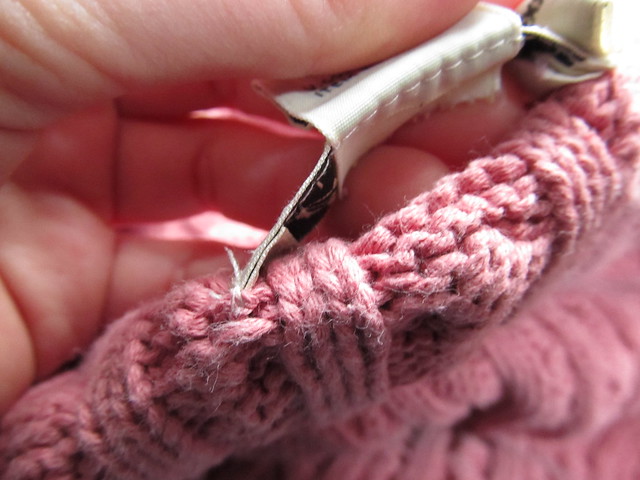
Using your scissors, you'll want to snip one of the edges of the little v's. This is the part that will take practice and might be a teeny bit frustrating at first but trust me, you'll get better. The crochet seam unravels from the top down, which means you'll want to snip one of them as far to the top of the little v's as you can get. Also, I've found that some sweaters are crochet seamed along the side all the way up to the sleeves so it might be as easy as finding the right seam to unravel.
TIP: Don't forget to cut off any tags or care instructions from your garment using a seam ripper or by being very gentle with a pair of scissors. Since most often they are sewn on with a sewing machine, it is best to use a seam ripper if you have one.
Now that you have cut one of your little v's, it's time to start unravelling your seam. You might need to untangle the thread a little bit first, but once you have your seam free, you can just pull on the string and it comes undone very nicely for you.
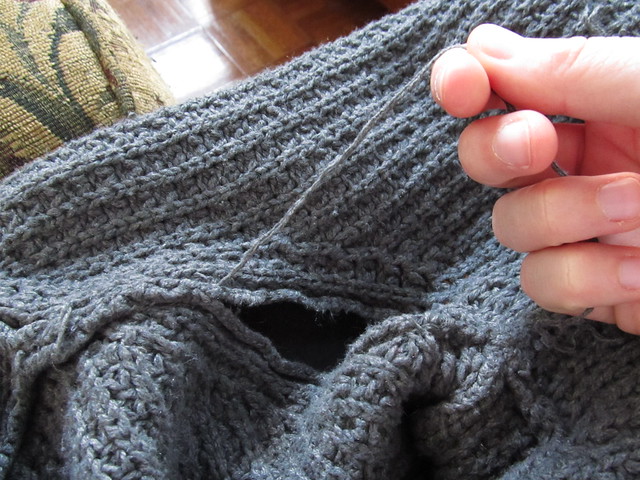
Once you have removed all of the seams from your garment, you can unravel each piece of the sweater. TIP: It is always better to wind the yarn into a ball as you go because it reduces the risk of tangling that would occur if you left all the unravelled yarn in a pile (trust me, I know from experience how much "fun" unravelling knots is!)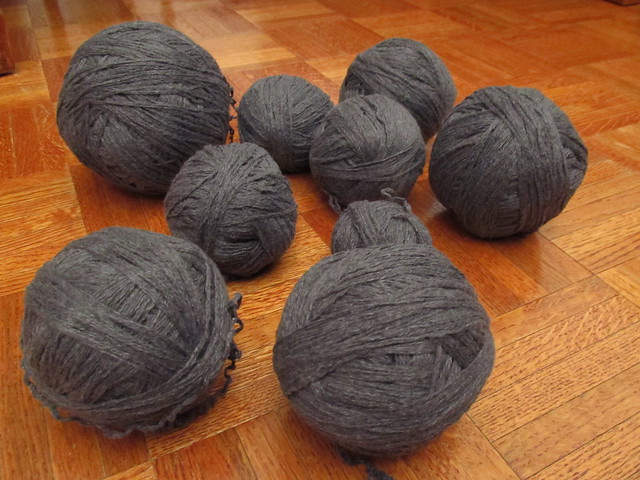
With a little practice, you can start knitting from recycled sweaters in no time! If you have any questions, feel free to ask, I'd love to help!
1) Less Expensive!
If you buy a sweater from a used clothing store, you can usually find a sweater's worth of yarn for $10 or less
2) Care Instructions
It is common practice for store bought garments to have labels on them that tell you how to wash it. Also, because the clothing in a thrift store is already worn, you can immediately weed out sweaters that are easily felted, hard to care for, pill easily because you get to see what the yarn looks like knit up before you buy it
3) Protects Landfills
Sweaters don't literally protect landfills but if you recycle yarn instead of always buying store bought, you are keeping that sweater out of the garbage heap and you are making something beautiful out of it (remember the 3 R's-Reduce, Reuse and Recycle?). Even though sweaters at thrift stores have the potential of being purchased as is and reused by another customer, it still helps the avid diy enthusiast from burdening the planet.
4) Protects the Ecosystem
Unless you purchase yarn that has a completely see-through policy about their production methods, you could potentially adding to the overuse of pesticides on plant crops such as cotton or bamboo. Reusing yarn decreases the need for yarn production and therefore pesticide use
5) Less Knots
This is just a personal preference, but I find that store bought sweater yarn has fewer knots than conventional yarn. Also, since you are unravelling whole garment pieces instead of using individual skeins, there are less knots necessary for connecting pieces together.
So, now that you are aware of how cool it is to reuse yarn, let's get on our merry way shall we?
So, first thing you're going to need to do is acquire a sweater acceptable to our purposes. Not all sweaters are created equally but I am here to arm you with the knowledge you need to choose the right sweater.
TIP: It is always better to look for sweaters in the biggest sizes possible, including mens sweaters because obviously there is more yarn. You don't need to make sure the sweater fits your body because it is going to be deconstructed later.
Let's have a look at the inside of the sweater. One of the ways you can tell if a sweater is good for recycling is to check out the seams. If all the seams on your sweater look like this one, which is serged with a serger machine and therefore the pieces of the sweater were cut up and sewn together, then you can put it right back down.
If your sweater seams all look like this, slightly bulky and not sewn together with a sewing machine, then you are one step closer to having a great sweater.
TIP: Make sure you look at the label of the sweater to see what the yarn is made out of and what the care instructions are. Cotton sweaters are pretty easy to unravel, although they might not be super soft when you are finished. Cotton is better for projects that don't need to be against the skin because it is made more durably than other yarns. Also, if the yarn is acceptable next to your skin when it is in thrift store sweater form, it will be acceptable once you unravel it. Be careful of purchasing wool because it will shrink on you if not properly cared for.
Next, you'll want to figure out what kind of seam you actually have. This sweater, except for the very top of the neck which was serged, has a crochet seam which is very easy to unravel. It is identifiable because it has a row of little v's on one side of the seam and a row of dashes on the other (look at the next picture to see what I'm talking about).
Using your scissors, you'll want to snip one of the edges of the little v's. This is the part that will take practice and might be a teeny bit frustrating at first but trust me, you'll get better. The crochet seam unravels from the top down, which means you'll want to snip one of them as far to the top of the little v's as you can get. Also, I've found that some sweaters are crochet seamed along the side all the way up to the sleeves so it might be as easy as finding the right seam to unravel.
TIP: Don't forget to cut off any tags or care instructions from your garment using a seam ripper or by being very gentle with a pair of scissors. Since most often they are sewn on with a sewing machine, it is best to use a seam ripper if you have one.
Now that you have cut one of your little v's, it's time to start unravelling your seam. You might need to untangle the thread a little bit first, but once you have your seam free, you can just pull on the string and it comes undone very nicely for you.
Once you have removed all of the seams from your garment, you can unravel each piece of the sweater. TIP: It is always better to wind the yarn into a ball as you go because it reduces the risk of tangling that would occur if you left all the unravelled yarn in a pile (trust me, I know from experience how much "fun" unravelling knots is!)
With a little practice, you can start knitting from recycled sweaters in no time! If you have any questions, feel free to ask, I'd love to help!
Saturday, October 27, 2012
Happy Make a Difference Day!
Today is Make a Difference Day and I volunteered this morning pulling ivy off of some trees (they were being choked!) and I cleaned up some beaches with some lovely Americorps folks. What did you/are you doing to celebrate?
Thursday, October 25, 2012
Enjoying Nature
I don't know about you, but every year when the weather starts to take a down turn, I get a little bit less excited about being outside than I normally do. Don't get me wrong, there are some beautiful and amazing things about being outside in the autumn, but some days the weather is just too dreary and dull. In fact, generally this time of year is when I get the most reading done in my spare time because I spend so much more time indoors hiding from the weather that I could basically be a librarian!
Today, though, was a different story. I am currently in the tail end of a month long series of training sessions for a job that I started in September. It has eaten up a lot of my time, which it should, and it has meant that a lot of my time is spent indoors and transitioning from heated room to heated vehicle to heated house. When I step outside after my training is over, I'm not exactly thrilled to see that it is raining again or that I have to put my huge ski parka back on because otherwise I'd freeze to death!
Anyway, to make a short story way longer than it probably needs to be, I stepped out of my training today and discovered that it was actually sunny outside. It wasn't warm (keep in mind that I live in Washington state and when the sun is out, it's generally still cold), but it was a nice change from the sad weather outside. One of my favorite things to do in the autumn season is to take walks and enjoy nature. It's good exercise, it allows me to appreciate the changing of the seasons, and I feel more connected to my community when I go for a walk.
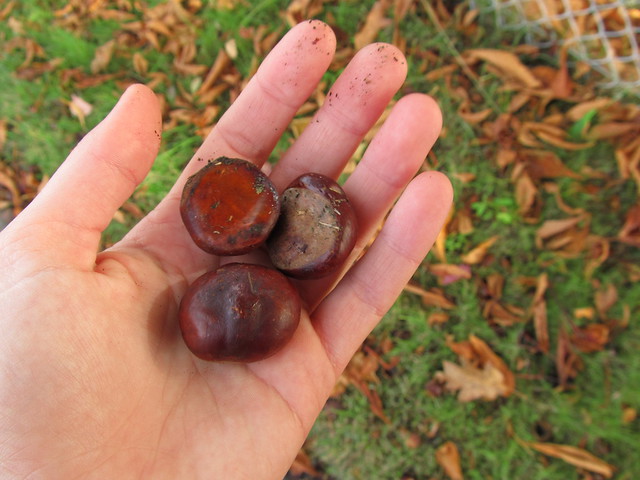
I found some of these little nuts on my walk. That's a whole other story, but basically when I first discovered them, I thought they were chestnuts and was very disappointed to find out that they are actually horse chestnuts and are poisonous. At least I'm informed now!
I also spotted the coolest sustainable play fort today made from scavenged car parts, reclaimed windows, roofing scraps and wooden crates. If I was a kid, and if that was my house, I would be all over it!
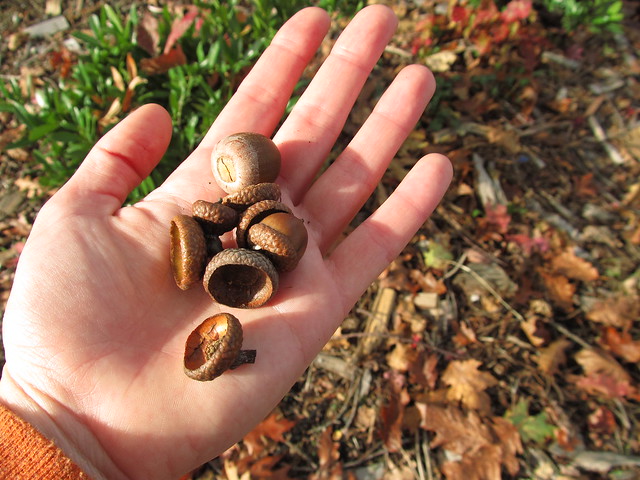
I also found another oak tree, this one being a black oak which has a totally different kind of acorns. Aren't they cute!

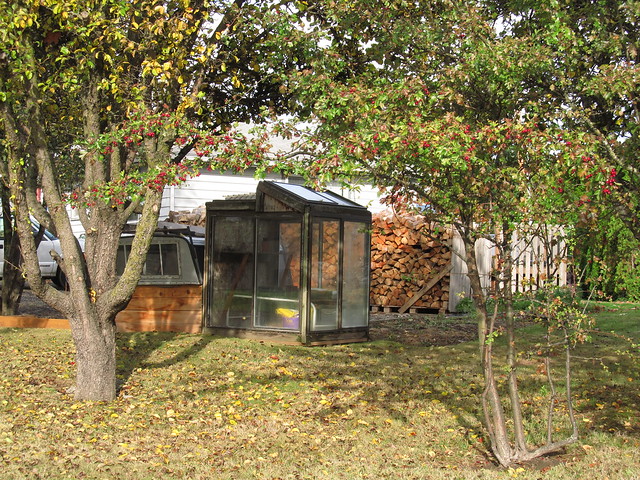
Last but not least, this is probably the cutest house I've ever seen and I would move in immediately if I was financially able (never mind the current tenants!). Their yard is so homey with the plants and trees. I can just imagine the little window seat with some hanging plants and a little bookshelf underneath for a cozy afternoon. Have you been enjoying nature lately? What have you spotted on your mini-adventures?
Today, though, was a different story. I am currently in the tail end of a month long series of training sessions for a job that I started in September. It has eaten up a lot of my time, which it should, and it has meant that a lot of my time is spent indoors and transitioning from heated room to heated vehicle to heated house. When I step outside after my training is over, I'm not exactly thrilled to see that it is raining again or that I have to put my huge ski parka back on because otherwise I'd freeze to death!
Anyway, to make a short story way longer than it probably needs to be, I stepped out of my training today and discovered that it was actually sunny outside. It wasn't warm (keep in mind that I live in Washington state and when the sun is out, it's generally still cold), but it was a nice change from the sad weather outside. One of my favorite things to do in the autumn season is to take walks and enjoy nature. It's good exercise, it allows me to appreciate the changing of the seasons, and I feel more connected to my community when I go for a walk.
I found some of these little nuts on my walk. That's a whole other story, but basically when I first discovered them, I thought they were chestnuts and was very disappointed to find out that they are actually horse chestnuts and are poisonous. At least I'm informed now!
I also spotted the coolest sustainable play fort today made from scavenged car parts, reclaimed windows, roofing scraps and wooden crates. If I was a kid, and if that was my house, I would be all over it!
I also found another oak tree, this one being a black oak which has a totally different kind of acorns. Aren't they cute!
Last but not least, this is probably the cutest house I've ever seen and I would move in immediately if I was financially able (never mind the current tenants!). Their yard is so homey with the plants and trees. I can just imagine the little window seat with some hanging plants and a little bookshelf underneath for a cozy afternoon. Have you been enjoying nature lately? What have you spotted on your mini-adventures?
Wednesday, October 24, 2012
Easy and Free Knitting Patterns: Wool Scarf
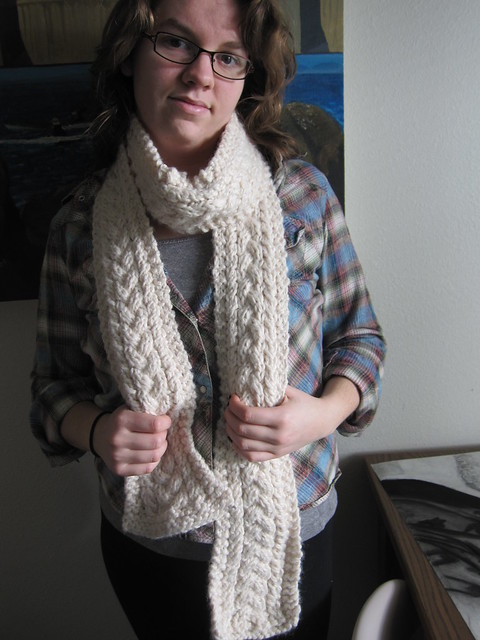
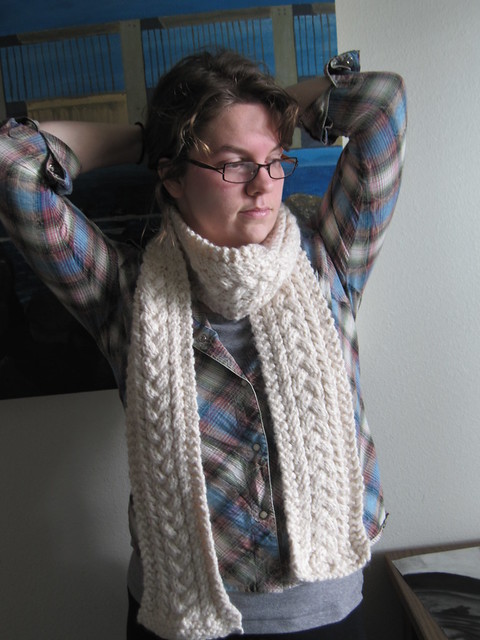
I wasn't planning on starting now, but I have a pattern for any of you knitters out there! I am an avid knitter and I have been working on a lot of knitting patterns because I have big big plans for the blog in the near-ish future. This pattern is called Durga because at the time of its creation, I was studying Hindu art and I was inspired. She is a Hindu goddess who was created from the other male gods when their powers weren't strong enough to slay the demon Mahishasura. I really like this goddess because she is more powerful than all the men; she was created when no one else could get the job done!
Durga the scarf pattern was also created when no other scarf pattern could get the job done. Made from bulky wool yarn, it is the perfect scarf to wrap around enough times to make your neck warm and cozy on those blustery days when none of your other scarves can do the job. Also, because the bulky yarn is thicker than most yarns, it is a fairly easy, mindless knit... in case you need to forget that you are making a giant rectangle... Oops, you just finished a scarf!
 Materials: US size 13 and 15 needles (I used circular needles)
Yarn: Lion Brand Wool Ease Thick and Quick. 2-3 skeins depending on preferred length
Gauge: Your gauge isn't really important to the scarf because it doesn't require shaping. If you really need a size reference, the final scarf width should be between 4 and 5 inches wide. The width depends on how much you want to knit.


Pattern:
Using size 13 needles, cast on 18 stitches. Knit 4 rows.
Switch to size 15 needles and begin cable pattern. Continue in cable pattern until piece reaches desired length (personal preference).
Switch back to size 13 needles. Knit 3 rows. Bind off all stitches.
Cable Pattern:
Row 1- k2, p1, C2F, p1, C4F, k2, p1, C2B, p1, k2
Row 2 and all even rows- k3, p2, k1, p6, k1, p2, k3
Row 3- k2, p1, C2F, p1, k2, C4B, p1, C2B, p1, k2
 I have one more thing to add before I finish... I used to have a knitting blog. There is a whole knitting community out there if you are interested and I was involved in it for a long time. I published patterns, including this one, on a different blog and I was really happy with it for a while. This summer, however, I realized that I didn't want to just focus on knitting anymore.
I have become much more interested in sustainability over the past few years and I wanted a way to showcase my experiments and simple ways that I changed my lifestyle. I created this blog just for that purpose, but I am still crazy about knitting. Every once in a while, I will add a new pattern for free because I believe that knitting/crocheting/crafting can be an integral part of your sustainable lifestyle if that's something you're interested in. I focus on accessories and my preferred medium is usually wool because I live in a colder climate. My knitwear designs are generally fairly practical, easy, and of course, free. Have a wonderful day and don't forget to bring along your new wool scarf!
UPDATE: I had a question about what the abbreviations meant for the cable section so here's a new list of what the abbreviations mean:
C2F-Put next stitch on the cable needle and hold stitch in the front of the piece, knit one stitch, replace the stitch from the cable needle to the left hand needle, knit one stitch.
C2B-Put next stitch on the cable needle and hold stitch in the back of the piece, knit one stitch, replace the stitch from the cable needle to the left hand needle, knit one stitch.
C4F-Put next 2 stitches on the cable needle and hold stitches to the front of the piece, knit two stitches, replace the stitches from the cable needle to the left hand needle, knit two stitches.
C4B-Put next 2 stitches on the cable needle and hold stitches to the back of the piece, knit two stitches, replace the stitches from the cable needle to the left hand needle, knit two stitches.
Durga the scarf pattern was also created when no other scarf pattern could get the job done. Made from bulky wool yarn, it is the perfect scarf to wrap around enough times to make your neck warm and cozy on those blustery days when none of your other scarves can do the job. Also, because the bulky yarn is thicker than most yarns, it is a fairly easy, mindless knit... in case you need to forget that you are making a giant rectangle... Oops, you just finished a scarf!
Yarn: Lion Brand Wool Ease Thick and Quick. 2-3 skeins depending on preferred length
Gauge: Your gauge isn't really important to the scarf because it doesn't require shaping. If you really need a size reference, the final scarf width should be between 4 and 5 inches wide. The width depends on how much you want to knit.
Pattern:
Using size 13 needles, cast on 18 stitches. Knit 4 rows.
Switch to size 15 needles and begin cable pattern. Continue in cable pattern until piece reaches desired length (personal preference).
Switch back to size 13 needles. Knit 3 rows. Bind off all stitches.
Cable Pattern:
Row 1- k2, p1, C2F, p1, C4F, k2, p1, C2B, p1, k2
Row 2 and all even rows- k3, p2, k1, p6, k1, p2, k3
Row 3- k2, p1, C2F, p1, k2, C4B, p1, C2B, p1, k2
I have become much more interested in sustainability over the past few years and I wanted a way to showcase my experiments and simple ways that I changed my lifestyle. I created this blog just for that purpose, but I am still crazy about knitting. Every once in a while, I will add a new pattern for free because I believe that knitting/crocheting/crafting can be an integral part of your sustainable lifestyle if that's something you're interested in. I focus on accessories and my preferred medium is usually wool because I live in a colder climate. My knitwear designs are generally fairly practical, easy, and of course, free. Have a wonderful day and don't forget to bring along your new wool scarf!
UPDATE: I had a question about what the abbreviations meant for the cable section so here's a new list of what the abbreviations mean:
C2F-Put next stitch on the cable needle and hold stitch in the front of the piece, knit one stitch, replace the stitch from the cable needle to the left hand needle, knit one stitch.
C2B-Put next stitch on the cable needle and hold stitch in the back of the piece, knit one stitch, replace the stitch from the cable needle to the left hand needle, knit one stitch.
C4F-Put next 2 stitches on the cable needle and hold stitches to the front of the piece, knit two stitches, replace the stitches from the cable needle to the left hand needle, knit two stitches.
C4B-Put next 2 stitches on the cable needle and hold stitches to the back of the piece, knit two stitches, replace the stitches from the cable needle to the left hand needle, knit two stitches.
Monday, October 22, 2012
Indoor Plants
It's hard to write this post because it is so gloomy outside that I couldn't get very good pictures but I wanted to write about this topic because I have been doing a lot of experimentation with keeping houseplants over the course of the past year or so. I've been experimenting with different kinds of plants including succulents, ivy and even edibles because I want to 1) improve the quality of the air in my living space 2) learn more about keeping plants alive and 3) start keeping plants with dual purposes. By dual purposes, I mean that I want plants that are useful because they help filter the air and also because I can use them in another way. I'll show you in a second.
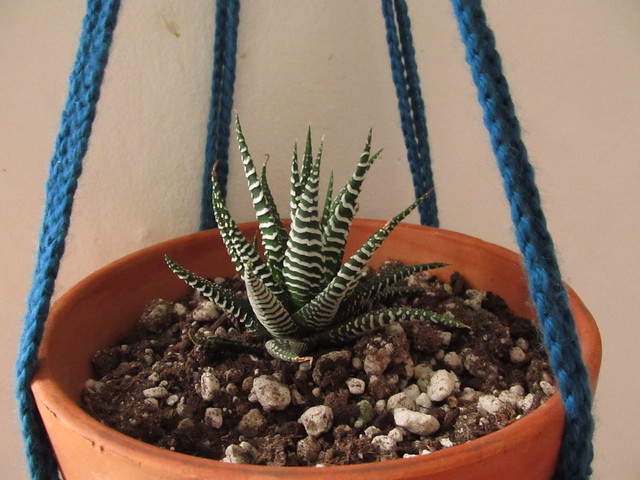
First on the list is this really cool succulent is a Haworthia Attenuata and it is very low maintenance. It's not very big because I got it about a month ago and so far, everything is going well. I would categorize this plant under the "I really like the look of this plant so I'm going to try it out". I don't really have any other reason than that for wanting one, purely aesthetic reasons.
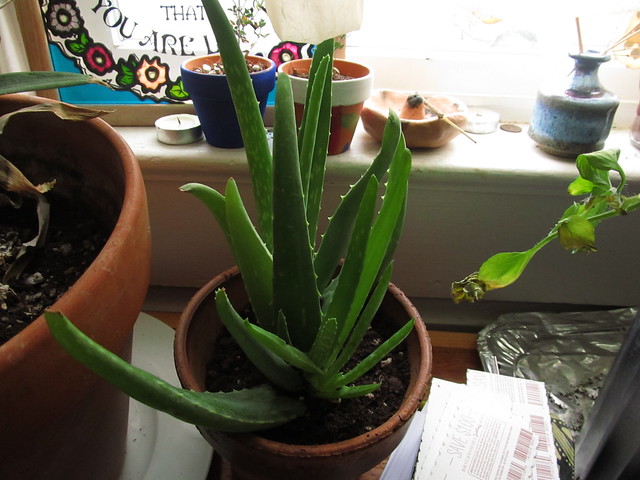
Next we have the Medicinal Aloe Vera plant that I'm sure you might recognize. This is one of those dual purpose plants I was talking about before. Of course I want to be able to clean the air but I also want to experiment making lotions and gels with this aloe once it gets a little bit bigger. I already broke one of the fronds because I had to transport it on Phillipa but I didn't use the gel. I know, I feel bad for wasting it but I don't know what to do with it yet and I don't have THAT much free time.
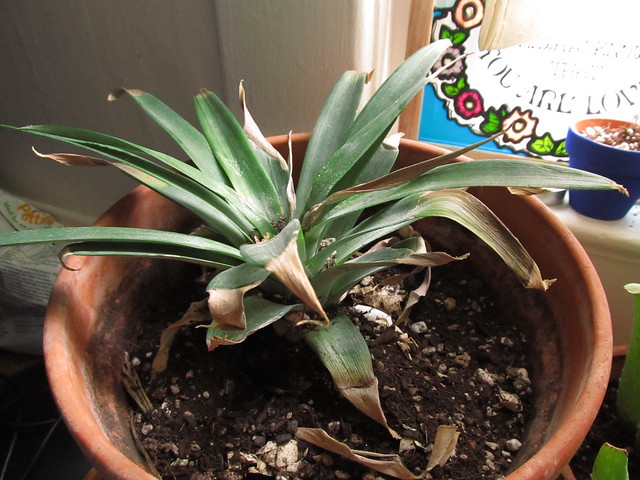
Next up is a 100% experiment plant that I'm not sure is going to live. Anyone know what it is? I'll give you a hint... it rhymes with bineapple... Yep, it's a pineapple! I potted the plant using this tutorial (except I cut away all the fruit first since it was attracting a lot of fruit flies. And because obviously my pineapple doesn't look very good, I've been using this website as motivation not to give up. There are some roots growing but I don't think it likes my chilly bedroom. Also, I'm afraid since it wasn't an organic pineapple that it might not create a new pineapple. We shall see I guess :)
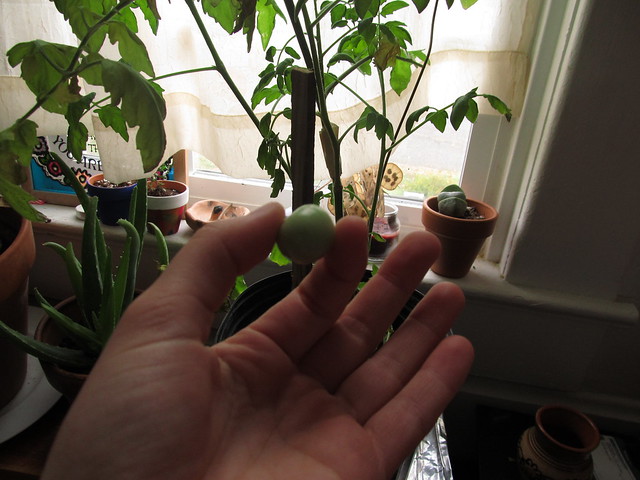
Last but not least, my pride and joy, is my tomato plant! Did you know you can grow tomatoes indoors? Me neither! But, I've had this little volunteer plant in my bedroom since the end of June and it hasn't died yet. In fact, it produced that little green tomato and I couldn't resist trying it. The tomato itself was a little bitter but since there are more little green gems popping up, I'm not deterred! You can also see I have a split rock on the right and some new thyme plants on the left but I couldn't get any good pictures of those.
Again, I apologize for the bad quality of some of the photos but it is pretty difficult to get good images when the weather is so uncooperative! If you want to know more about how I am doing with my plants, you can always leave a comment in the comment box for me... I would love to know who's out there reading what I have to say! Also, if you want to try your own experiments, I included all the links that I have used in order to find success with my plants. Good luck and happy indoor gardening!
First on the list is this really cool succulent is a Haworthia Attenuata and it is very low maintenance. It's not very big because I got it about a month ago and so far, everything is going well. I would categorize this plant under the "I really like the look of this plant so I'm going to try it out". I don't really have any other reason than that for wanting one, purely aesthetic reasons.
Next we have the Medicinal Aloe Vera plant that I'm sure you might recognize. This is one of those dual purpose plants I was talking about before. Of course I want to be able to clean the air but I also want to experiment making lotions and gels with this aloe once it gets a little bit bigger. I already broke one of the fronds because I had to transport it on Phillipa but I didn't use the gel. I know, I feel bad for wasting it but I don't know what to do with it yet and I don't have THAT much free time.
Next up is a 100% experiment plant that I'm not sure is going to live. Anyone know what it is? I'll give you a hint... it rhymes with bineapple... Yep, it's a pineapple! I potted the plant using this tutorial (except I cut away all the fruit first since it was attracting a lot of fruit flies. And because obviously my pineapple doesn't look very good, I've been using this website as motivation not to give up. There are some roots growing but I don't think it likes my chilly bedroom. Also, I'm afraid since it wasn't an organic pineapple that it might not create a new pineapple. We shall see I guess :)
Last but not least, my pride and joy, is my tomato plant! Did you know you can grow tomatoes indoors? Me neither! But, I've had this little volunteer plant in my bedroom since the end of June and it hasn't died yet. In fact, it produced that little green tomato and I couldn't resist trying it. The tomato itself was a little bitter but since there are more little green gems popping up, I'm not deterred! You can also see I have a split rock on the right and some new thyme plants on the left but I couldn't get any good pictures of those.
Again, I apologize for the bad quality of some of the photos but it is pretty difficult to get good images when the weather is so uncooperative! If you want to know more about how I am doing with my plants, you can always leave a comment in the comment box for me... I would love to know who's out there reading what I have to say! Also, if you want to try your own experiments, I included all the links that I have used in order to find success with my plants. Good luck and happy indoor gardening!
Friday, October 19, 2012
Plant Hanger
So, it's been a crazy and rough week, but I thought I'd round out Friday with a little project that you can do with your new crochet skills... making a plant hanger!
I know you're probably thinking "Weird, I haven't seen plant hangers like these since the '90's!" Well, I'm here to tell you that they are awesome and they have the added benefit of creating more surfaces for my plants to rest on! Without further ado, here's how you make one...
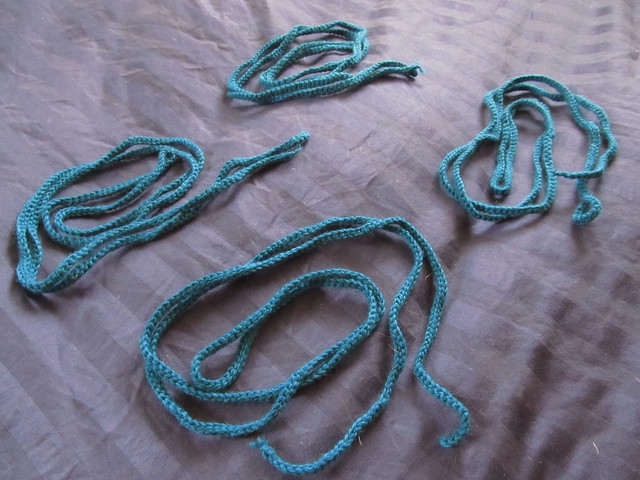
Start off with 4 icords of equal length. You want to make sure that you measure the chain that you make with some kind of ruler or soft tape measure so that all your icords come out the same length. I had the misfortune of making two of very different lengths because I forgot to compensate for the shrinkage that happens when you make an icord.
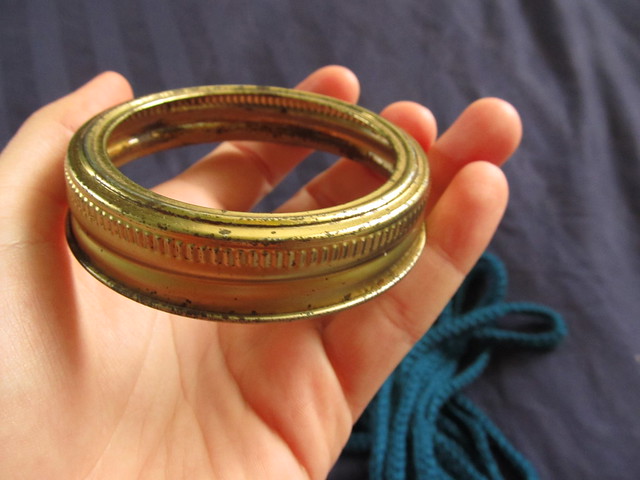
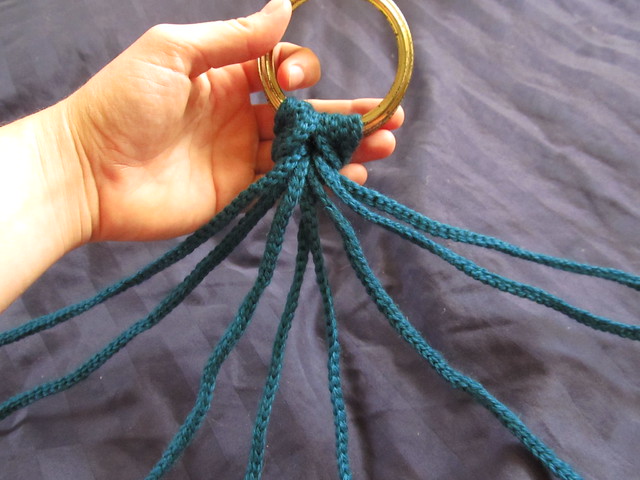
You'll also need some kind of sturdy round thing. Since I'm all about reusing what I already have, I took a ring off one of the jars of applesauce that I made a few weeks ago and repurposed it for this project.
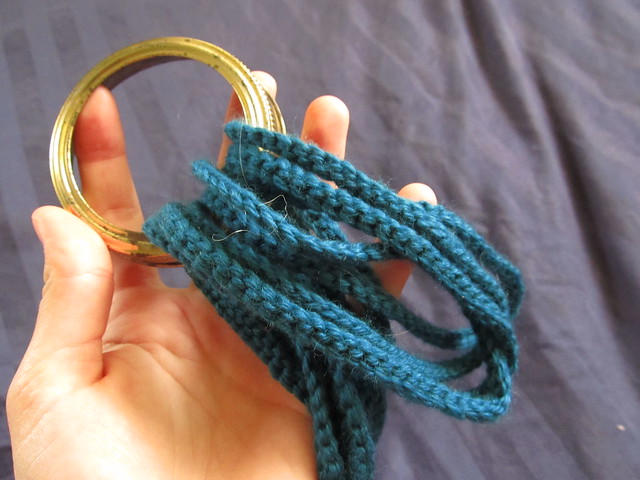
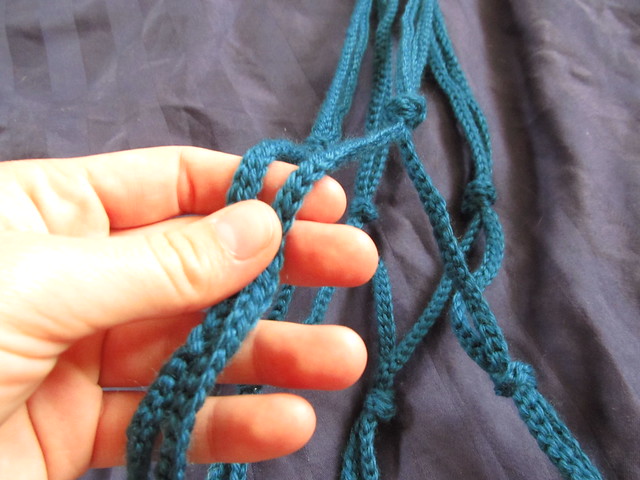
Next, you'll need to find the middle of your icords. When you find the middle, place the loops through your sturdy ring like so...
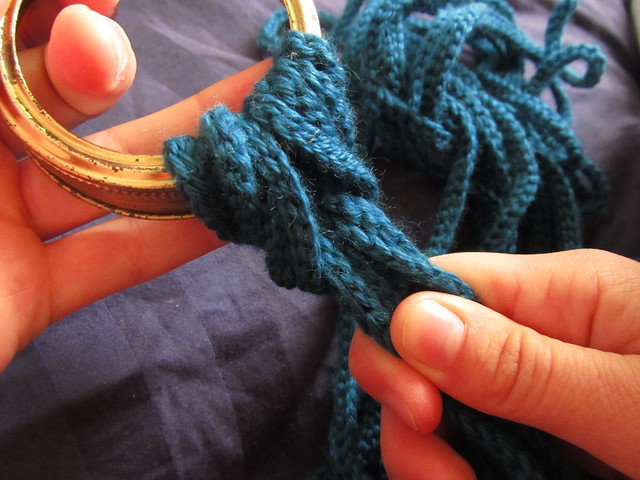
Now, stick the tails of the icords through that loop.

And pull it tight like so. Now, your plant will stay secured because there's no way a plant can rip through a metal jar ring.... knock on wood, I don't want anything crazy happening to me this week!
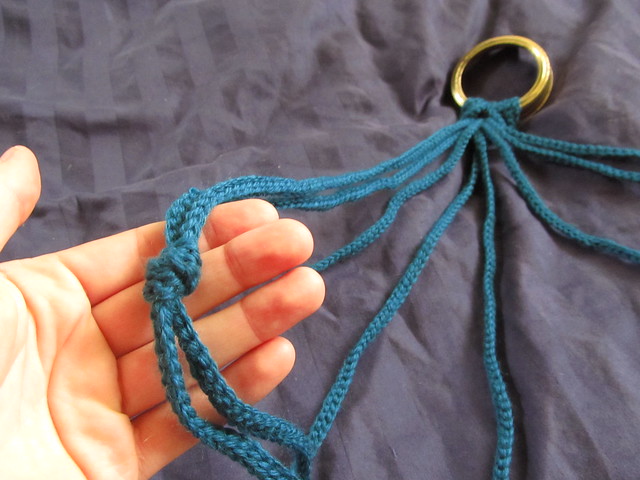
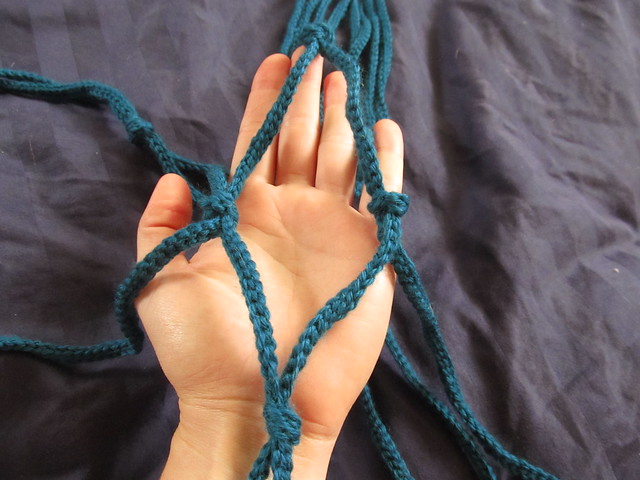
You'll probably want a good surface to work on like a bed or a table. Spread out the different strands of icord that come from the bottom of the ring.
What you want to do now is take the first two cords and tie a knot in them about a foot down from the ring at the top. If your knots are too high on the icord, you won't be able to fit your pot inside the hanger.
 Make knots in all of the strings like so. When you are done with the knotting, your hanger should look like this. Separate the cords so that opposite cords are next to each other.
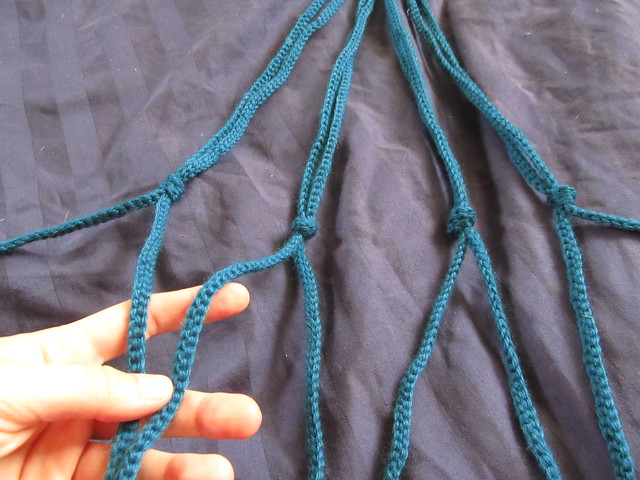
You might be able to guess the next step... make knots in each of the cords that are next to each other. I put my knots about 4 inches down from the top ones, but it's really up to you and how much cord you have.
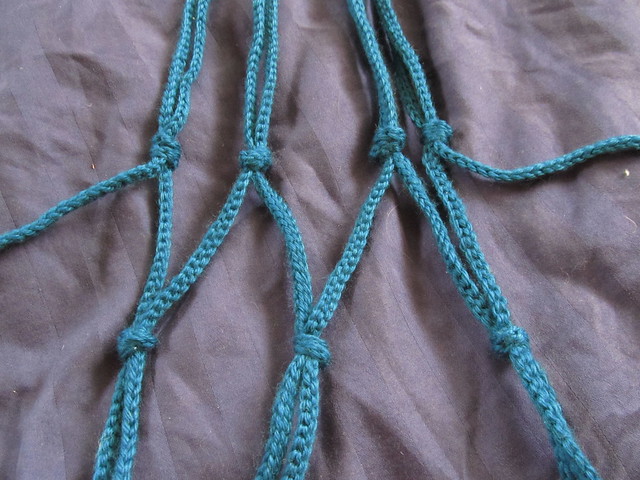
Next, take the last two cords and tie a knot about the same height as your other knots. You may notice that my knots are about the same height and distance from the ring as the other knots on each level. This is important so that your plant hangs properly in its hanger. We don't want any uncomfortable plants now do we?!
Now, I kind of jumped ahead of you and did a whole next row of knots, but it's the same principle as the first two rows. You'll just separate the strands and tie a knot, continuing to make knots until you have 4! You can keep separating strands and creating new knots until you run out of cord but it is important to at least have one diamond in your hanger... see the diamond? This ensures that the plant hangs securely and evenly on the hanger.
Once you've decided to be done making knots and separating strands, you'll want to gather up all the ends like so. It's okay if they are a little bit different lengths but they should be pretty close.
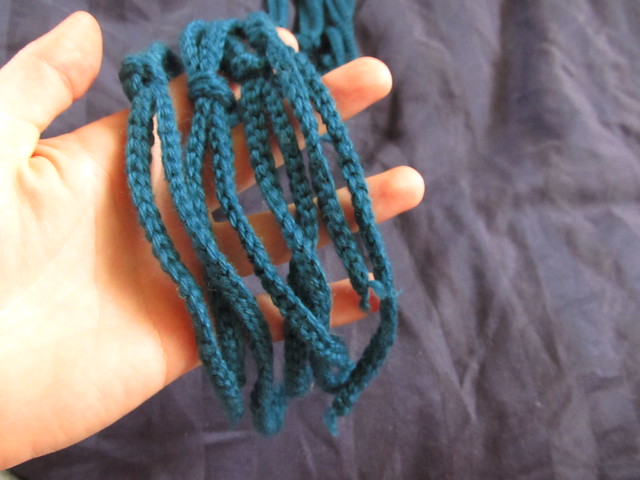
Make a big, jinormous knot out of all eight strands from your hanger and...

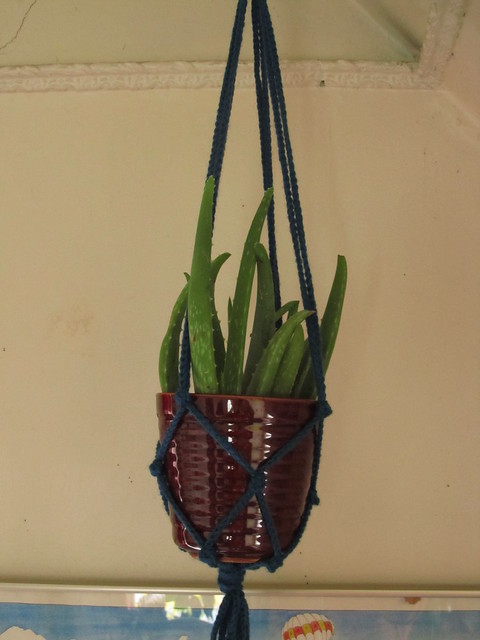
Put your happy plant inside of it! Mine is a medicinal aloe plant that I'm trying not to kill but we shall see. Look at you go, making plant hangers and everything!
I know you're probably thinking "Weird, I haven't seen plant hangers like these since the '90's!" Well, I'm here to tell you that they are awesome and they have the added benefit of creating more surfaces for my plants to rest on! Without further ado, here's how you make one...
Start off with 4 icords of equal length. You want to make sure that you measure the chain that you make with some kind of ruler or soft tape measure so that all your icords come out the same length. I had the misfortune of making two of very different lengths because I forgot to compensate for the shrinkage that happens when you make an icord.
You'll also need some kind of sturdy round thing. Since I'm all about reusing what I already have, I took a ring off one of the jars of applesauce that I made a few weeks ago and repurposed it for this project.
Next, you'll need to find the middle of your icords. When you find the middle, place the loops through your sturdy ring like so...
Now, stick the tails of the icords through that loop.
And pull it tight like so. Now, your plant will stay secured because there's no way a plant can rip through a metal jar ring.... knock on wood, I don't want anything crazy happening to me this week!
You'll probably want a good surface to work on like a bed or a table. Spread out the different strands of icord that come from the bottom of the ring.
What you want to do now is take the first two cords and tie a knot in them about a foot down from the ring at the top. If your knots are too high on the icord, you won't be able to fit your pot inside the hanger.
Make knots in all of the strings like so. When you are done with the knotting, your hanger should look like this. Separate the cords so that opposite cords are next to each other.
You might be able to guess the next step... make knots in each of the cords that are next to each other. I put my knots about 4 inches down from the top ones, but it's really up to you and how much cord you have.
Next, take the last two cords and tie a knot about the same height as your other knots. You may notice that my knots are about the same height and distance from the ring as the other knots on each level. This is important so that your plant hangs properly in its hanger. We don't want any uncomfortable plants now do we?!
Now, I kind of jumped ahead of you and did a whole next row of knots, but it's the same principle as the first two rows. You'll just separate the strands and tie a knot, continuing to make knots until you have 4! You can keep separating strands and creating new knots until you run out of cord but it is important to at least have one diamond in your hanger... see the diamond? This ensures that the plant hangs securely and evenly on the hanger.
Once you've decided to be done making knots and separating strands, you'll want to gather up all the ends like so. It's okay if they are a little bit different lengths but they should be pretty close.
Make a big, jinormous knot out of all eight strands from your hanger and...
Put your happy plant inside of it! Mine is a medicinal aloe plant that I'm trying not to kill but we shall see. Look at you go, making plant hangers and everything!
Wednesday, October 17, 2012
Foraging Adventures: Acorns
I am always on the lookout for new things to try and ways to be more sustainable. I do have a garden that I pick fresh greens out of (I'll talk about that more another time), but who doesn't love stumbling upon something that required no labor just waiting to be harvested? You know what I'm talking about if you live in Washington like me... summer basically means blackberry pie, cobbler, jam, and wine.
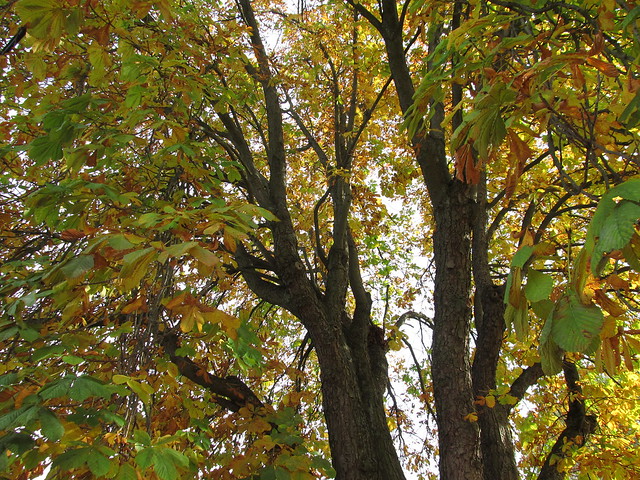
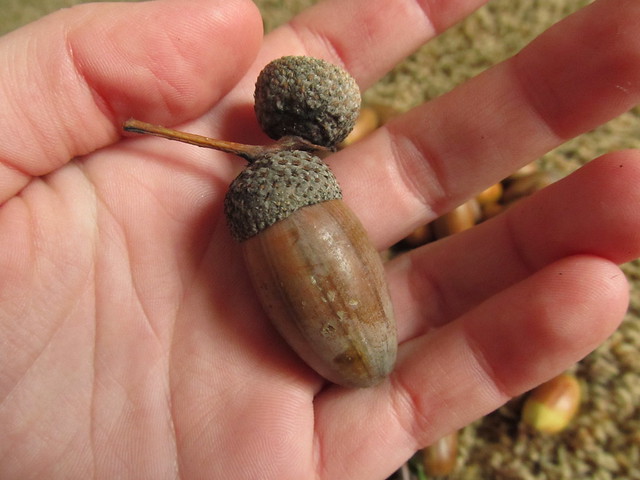
One night, I was wandering along home on a different route than I usually take, but this time I was on foot. Now, I told you how much I bike right? Well, this was one of those rare occasions where I decided to walk home. It gets pretty blustery in Bellingham in the autumn so I thought at first that it was just rain and wind rustling around in the trees. I notice these fairly large rain drops falling from the tree, but somehow I'm not getting wet at all. Confused, I look down at the ground and realize that it wasn't rain at all that was falling from the tree... it was an acorn!
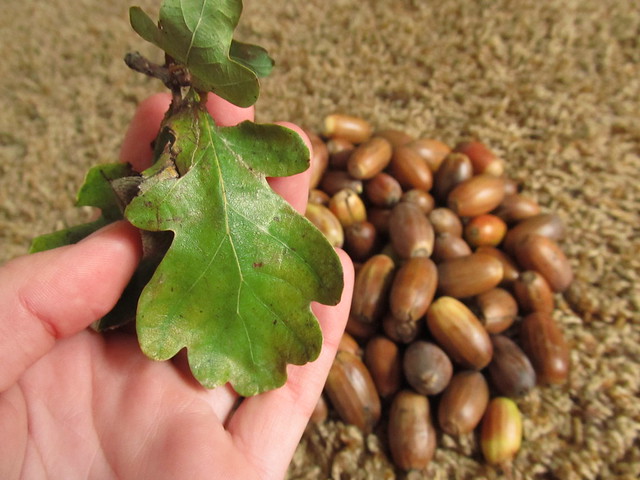
Now, I had to do some extensive research to figure out which tree this little acorn came from (well, actually it's quite a big acorn but that's alright). Eventually I found the USDA Plant Database and I'm thinking the tree was an Oregon White Oak tree. Correct me if I am wrong, but it was the closest leaf I could find that had lobes and solid margins. Here's one of the leaves I picked up from off the ground to help me identify it.
After locating these shiny jewels, I decided to come back later to harvest and do some research in the mean time about whether or not I could eat them. Turns out, acorns are very edible and good for you. One stumbling block I'm going to have, though, is preparing the acorns. It's going to be a lot of work to make anything out of these tasty jewels, so I better get cracking (pun intended!).
In case you are interested too, here are the links I found while researching acorns and what to do with them. I'm considering making some acorn flour but the acorn soup looks pretty good too. Have you ever made anything with acorns?
theatlantic.com has a post about acorn recipes here.
Backwoods Home Magazine has an article about harvesting acorns and what to do with them after here
Practical Survivor has a great resource for harvested edibles, including the acorn here.
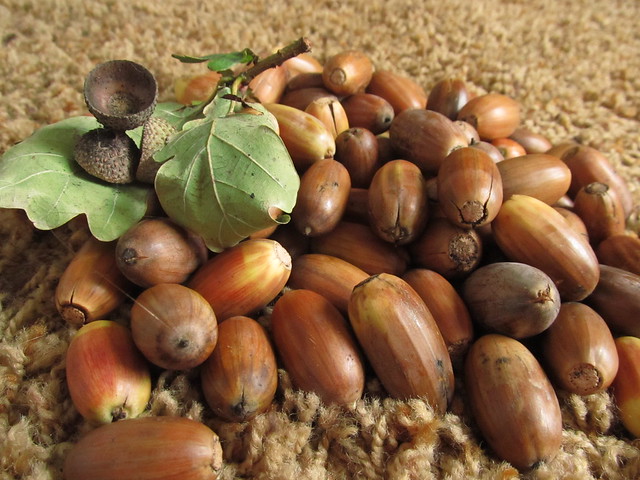
I'll definitely keep you updated on what I create out of these acorns. It may turn out to be a bust, but I'll try anything once, right?!
One night, I was wandering along home on a different route than I usually take, but this time I was on foot. Now, I told you how much I bike right? Well, this was one of those rare occasions where I decided to walk home. It gets pretty blustery in Bellingham in the autumn so I thought at first that it was just rain and wind rustling around in the trees. I notice these fairly large rain drops falling from the tree, but somehow I'm not getting wet at all. Confused, I look down at the ground and realize that it wasn't rain at all that was falling from the tree... it was an acorn!
Now, I had to do some extensive research to figure out which tree this little acorn came from (well, actually it's quite a big acorn but that's alright). Eventually I found the USDA Plant Database and I'm thinking the tree was an Oregon White Oak tree. Correct me if I am wrong, but it was the closest leaf I could find that had lobes and solid margins. Here's one of the leaves I picked up from off the ground to help me identify it.
After locating these shiny jewels, I decided to come back later to harvest and do some research in the mean time about whether or not I could eat them. Turns out, acorns are very edible and good for you. One stumbling block I'm going to have, though, is preparing the acorns. It's going to be a lot of work to make anything out of these tasty jewels, so I better get cracking (pun intended!).
In case you are interested too, here are the links I found while researching acorns and what to do with them. I'm considering making some acorn flour but the acorn soup looks pretty good too. Have you ever made anything with acorns?
theatlantic.com has a post about acorn recipes here.
Backwoods Home Magazine has an article about harvesting acorns and what to do with them after here
Practical Survivor has a great resource for harvested edibles, including the acorn here.
I'll definitely keep you updated on what I create out of these acorns. It may turn out to be a bust, but I'll try anything once, right?!
Saturday, October 13, 2012
Glass Jars
I can't begin to tell you how much I love glass jars! They are so versatile, easy to clean, and they are good for the environment! The three methods you learn about in school for reducing waste are the three R's "Reduce, Reuse and Recycle". Glass is a great option for all of these principles!
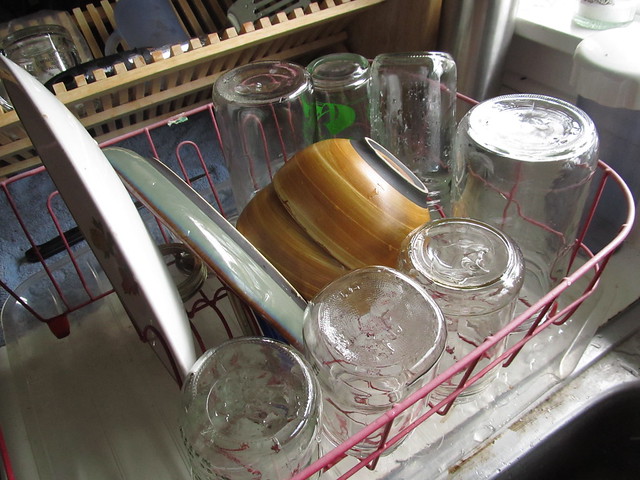
Let's start with Recycle: did you know that glass, when it is recycled, is turned into more glass? That should be pretty obvious but when plastic is "recycled", it isn't turned into more plastic containers. Usually, plastic is turned into downcycled products such as carpet padding, plastic lumber, and jackets. I do my fair share of recycling of glass jars too, but for the most part, I reuse them until something catastrophic happens (such as cracks, chips, or if someone decided to rob my house and deprive me of my glass jars... that's how much I love reusing them!). I'm not certain if this is true, and please comment if you have more information about this, but I always feel like food stored in glass jars tastes better and I don't worry about chemicals leeching into my precious consumables.
This is generally what my kitchen looks like after I've done the dishes (we don't have a dishwasher, we do all our dishes by hand). So many glass jars and most of them are reused from food that we ate.

Here's another glass jar spotted on the table in the living room. Do you have a need for holding beans that were collected from your garden? Well, there's an answer for that (I'll give you three guesses...)
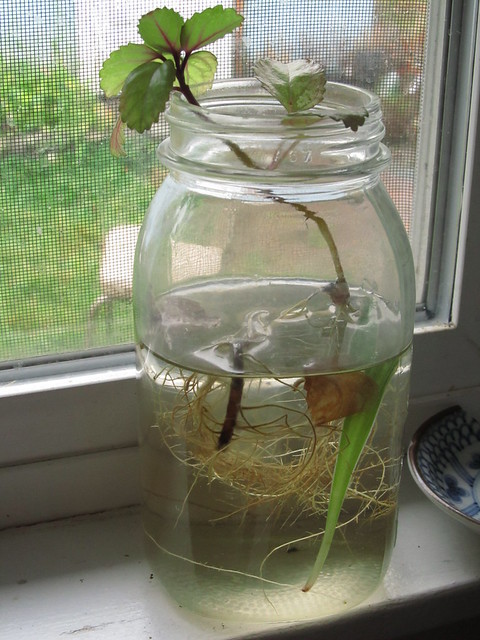
We also use them for making cuttings of plants. This little one is ready to be transplanted already! Look at all those roots...
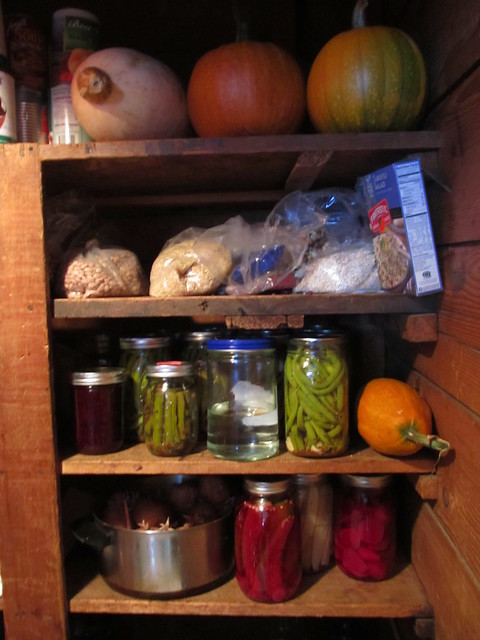
And finally, the pantry. Ours is filled with canned vegetables from our garden and from the farms that my roomies work on. Yummy!
WAYS TO REUSE GLASS JARS:
-Use them anywhere you would use tupperware
-Can food with mason jars that can be reused over and over as long as the integrity of the jar is intact
-Take cuttings off your existing house plants and let them grow roots in a reused glass jar
-Make beeswax candles out of your old jars
-If you're into drinking wine, make some drinking glasses out of the jars
-Better yet, use those wine glasses to make candles
-Use them as water bottles instead of buying one of those crappy plastic ones that always leak!
Really, the possibilities are endless if you just stop and think about the potential of the glass jar. How do you reuse your glass jars? Any more ideas?
Let's start with Recycle: did you know that glass, when it is recycled, is turned into more glass? That should be pretty obvious but when plastic is "recycled", it isn't turned into more plastic containers. Usually, plastic is turned into downcycled products such as carpet padding, plastic lumber, and jackets. I do my fair share of recycling of glass jars too, but for the most part, I reuse them until something catastrophic happens (such as cracks, chips, or if someone decided to rob my house and deprive me of my glass jars... that's how much I love reusing them!). I'm not certain if this is true, and please comment if you have more information about this, but I always feel like food stored in glass jars tastes better and I don't worry about chemicals leeching into my precious consumables.
This is generally what my kitchen looks like after I've done the dishes (we don't have a dishwasher, we do all our dishes by hand). So many glass jars and most of them are reused from food that we ate.
Here's another glass jar spotted on the table in the living room. Do you have a need for holding beans that were collected from your garden? Well, there's an answer for that (I'll give you three guesses...)
We also use them for making cuttings of plants. This little one is ready to be transplanted already! Look at all those roots...
And finally, the pantry. Ours is filled with canned vegetables from our garden and from the farms that my roomies work on. Yummy!
WAYS TO REUSE GLASS JARS:
-Use them anywhere you would use tupperware
-Can food with mason jars that can be reused over and over as long as the integrity of the jar is intact
-Take cuttings off your existing house plants and let them grow roots in a reused glass jar
-Make beeswax candles out of your old jars
-If you're into drinking wine, make some drinking glasses out of the jars
-Better yet, use those wine glasses to make candles
-Use them as water bottles instead of buying one of those crappy plastic ones that always leak!
Really, the possibilities are endless if you just stop and think about the potential of the glass jar. How do you reuse your glass jars? Any more ideas?
Thursday, October 11, 2012
Urban Chickens
Hi there! How's your Thursday going? Mine has been really fun but cold... (frowny face!). But, these photos of our chickens will surely bring a small smile to your face...
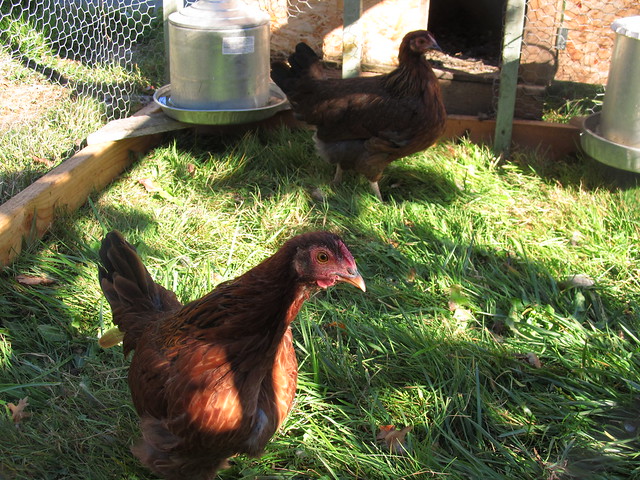
Meet Urusula and Joann
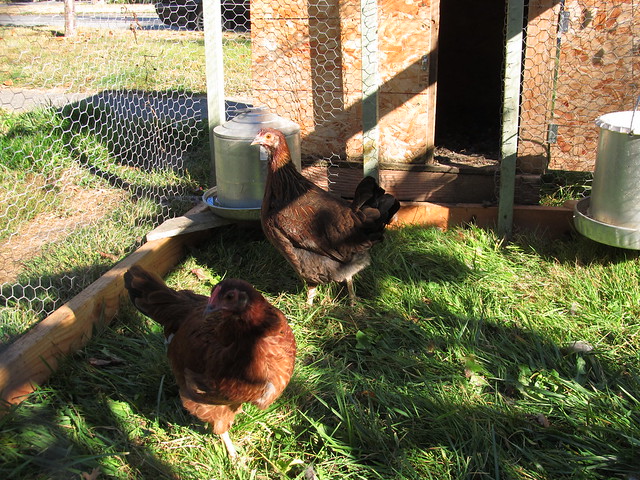
Now, these two silly little girls were already in residence when I moved in but I have loved getting to know them. They almost look like little dinosaurs the way they walk and move around. For the most part, because we live in a suburb, the chickens are penned but we move the pen every few days in order to give them fresh grass to munch on. Those two metal drums in the back are their other source of food, and that dark hole that seems to lead to nowhere is their coop, which keeps them warm at night.
If you have never considered keeping chickens, you definitely should because producing your own food is one of the best ways to be sustainable! These little ladies are too young yet to produce eggs but in about a year or so they will have some glorious, fresh eggs for us to enjoy. Although I didn't help set up this little habitat, there's a nice website here that should help you get started. Chickens are awesome because they are fairly inexpensive to keep, they provide great entertainment if you have kids (or are a kid at heart like me!), they provide eggs that are fresh and organic, and if you move their pen around, they keep the weeds out of your lawn! I think ours are Penedesenca chickens but I am not 100% certain. Don't you wanna take Joann home with you?
Meet Urusula and Joann
Now, these two silly little girls were already in residence when I moved in but I have loved getting to know them. They almost look like little dinosaurs the way they walk and move around. For the most part, because we live in a suburb, the chickens are penned but we move the pen every few days in order to give them fresh grass to munch on. Those two metal drums in the back are their other source of food, and that dark hole that seems to lead to nowhere is their coop, which keeps them warm at night.
If you have never considered keeping chickens, you definitely should because producing your own food is one of the best ways to be sustainable! These little ladies are too young yet to produce eggs but in about a year or so they will have some glorious, fresh eggs for us to enjoy. Although I didn't help set up this little habitat, there's a nice website here that should help you get started. Chickens are awesome because they are fairly inexpensive to keep, they provide great entertainment if you have kids (or are a kid at heart like me!), they provide eggs that are fresh and organic, and if you move their pen around, they keep the weeds out of your lawn! I think ours are Penedesenca chickens but I am not 100% certain. Don't you wanna take Joann home with you?
Wednesday, October 10, 2012
Right to Know
In California, voters are deciding about Proposition 37 which demands food companies to label whether or not their food has any GMO (Genetically Manufactured Organisms). Some people you might recognize got together to discuss this issue and the video is pretty hilarious! I'm just wishing Washington (State) would move in this direction... (hint, hint, hint).
Tuesday, October 9, 2012
Crochet Basics: I-Cord
It's time to get back to that little mini-series I was telling you about before. Today, I am going to show you how to make a crochet i-cord and now that you know the very basics of crocheting a chain, you should be able to follow along pretty well. Let me know if you have any questions, I would love to help a fellow fiber-enthusiast.
So, the first step in making an i-cord is to whip out a chain from the last tutorial. Once you have a chain of your desired length, go ahead and flip the chain over to the backside where it looks a little bit like chain links or some kind of weird stitching. It may help you to remember that the front of the chain looks a bit like v's and the back of the chain looks a bit like dashes.
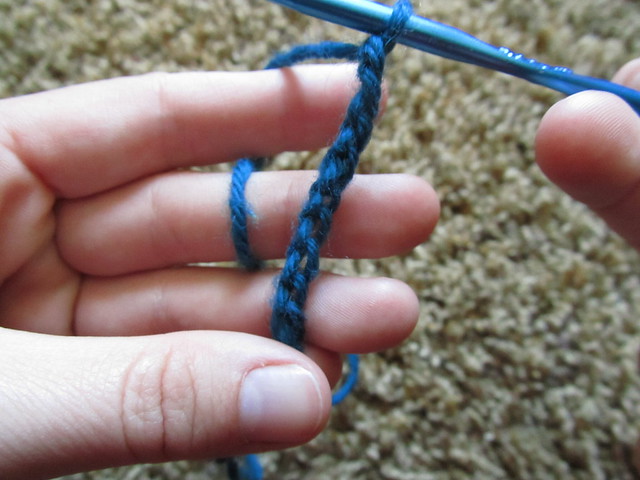
Now that you've found the back of your chain, you're going to put the hook into the first little dash that you can easily find. Trust me, the first one is a little bit tricky but the rest are sooooo much easier! It should look like this.

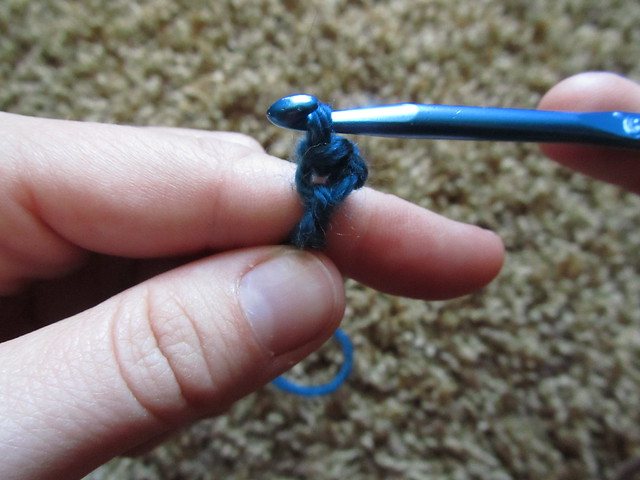
Go ahead and grab the working yarn that is attached to the ball with the crochet hook. Now you should have three little loops on your hook; one from the ball of yarn you just grabbed, the first dash in the back of the chain, and the very first loop that you had before.

Now, gently pull the last loop on your hook through the other two loops on your hook. It will look a little something like this when you are done.
Now, all that's left to do is repeat that process with all the rest of the little dashes in your chain. It can be a little bit tedious but it is so rewarding! This little section is what the i-cord will look like when it's all finished.
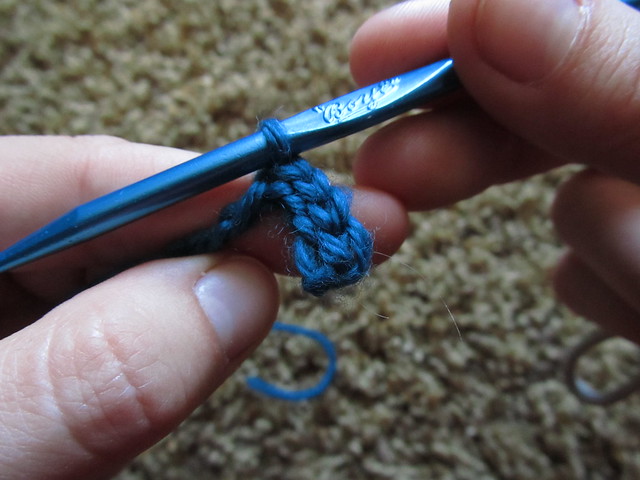
Keep going all the way til you reach the end of your chain until there is only one loop left on your hook. Cut the yarn that is attached to the ball (the working yarn) with a little bit of room for leeway (I always give at least an inch or two, maybe more) and pull the cut yarn through that last loop on your hook. Mine is a baby i-cord for demonstration purposes but there are so many uses for an i-cord. You are basically making rope that is slightly stretchy and very strong.

At the end of the week, I'll show you what all the commotion is leading up to because it is a super fun project that I'm sure you're going to love!
So, the first step in making an i-cord is to whip out a chain from the last tutorial. Once you have a chain of your desired length, go ahead and flip the chain over to the backside where it looks a little bit like chain links or some kind of weird stitching. It may help you to remember that the front of the chain looks a bit like v's and the back of the chain looks a bit like dashes.
Now that you've found the back of your chain, you're going to put the hook into the first little dash that you can easily find. Trust me, the first one is a little bit tricky but the rest are sooooo much easier! It should look like this.
Go ahead and grab the working yarn that is attached to the ball with the crochet hook. Now you should have three little loops on your hook; one from the ball of yarn you just grabbed, the first dash in the back of the chain, and the very first loop that you had before.
Now, gently pull the last loop on your hook through the other two loops on your hook. It will look a little something like this when you are done.
Now, all that's left to do is repeat that process with all the rest of the little dashes in your chain. It can be a little bit tedious but it is so rewarding! This little section is what the i-cord will look like when it's all finished.
Keep going all the way til you reach the end of your chain until there is only one loop left on your hook. Cut the yarn that is attached to the ball (the working yarn) with a little bit of room for leeway (I always give at least an inch or two, maybe more) and pull the cut yarn through that last loop on your hook. Mine is a baby i-cord for demonstration purposes but there are so many uses for an i-cord. You are basically making rope that is slightly stretchy and very strong.
At the end of the week, I'll show you what all the commotion is leading up to because it is a super fun project that I'm sure you're going to love!
Subscribe to:
Posts (Atom)